What is the sign for the printer drum needs to be replaced?
As many of you will already know, The drum unit is just a shelf and does not contain toner, and they must be use together with corresponding toner cartridge!
In the process of use, we often find that the service life of the drum unit will be much longer than that of the toner cartridge, so when do we need to replace the drum unit? What is the signs to replace the drum unit?
Error Message display from the machine
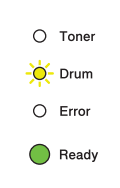
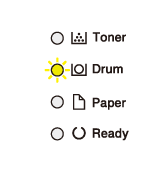
If the “Drum” LED flashes, it’s the first sign that the drum unit is going to run out and needs to be replaced soon. We recommend that you order a new drum unit to standby. V4ink provides you with the best-price alternative drum unit, which can save you up to 70%. You can also get a free trial before ordering from us. Click here to get free trial now!
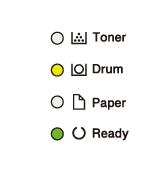
When the “Drum” LED is Lights up and the error message “Replace Drum” displays on the LCD of the printer, it means the drum unit has been run out and it’s time to replace the drum unit.
Poor print quality or black spots
If you find that the printer produces blurred, low-quality images, you may need to replace the drum unit. Black or colored toner spots on the printout also indicate that the drum unit is defective. In some cases, a horizontal line may appear on the printout each time the paper passes through the faulty part of the drum unit. In the above cases, the drum unit needs to be replaced.
Blank Printouts
If your printer doesn't give any error message, but there is a large area of blank or even all white in the printout, it also means that the drum unit need to be replaced.
How to replace the drum unit?
Step 1 - Turn off the machine, leave the machine for at lease 10 minutes to cool down.
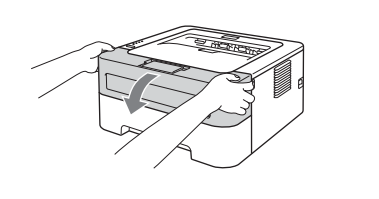
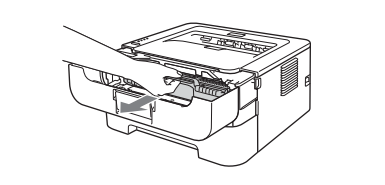
Step 2 - Open the front cover.
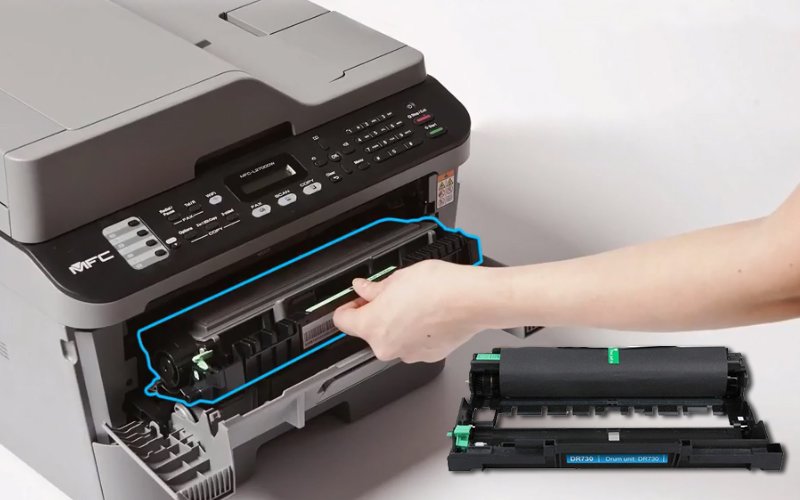
Step 3 - Take out the drum unit and toner cartridge from the machine (for Brother TN660 and TN760 which is drum unit and toner cartridge separation structure) and put them on a piece of disposable paper or cloth to avoid spill and scatter toner.
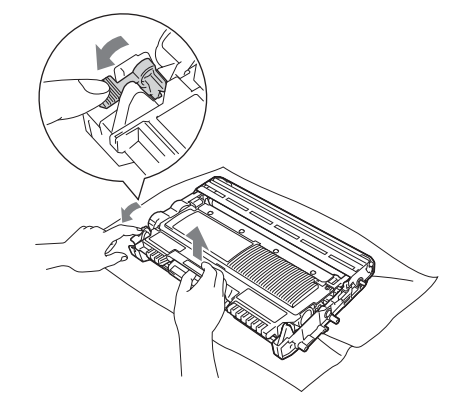
Step 4 - Push down the green lock lever and take the toner cartridge out of the drum unit.
Step 5 - Unpack a new drum unit.
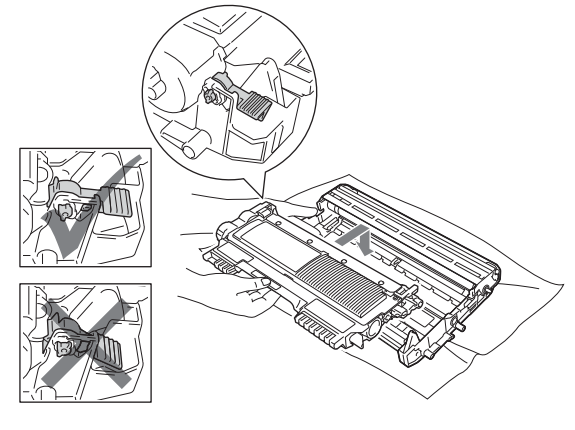
Step 6 - Put the toner cartridge into the new drum unit until you hear it lock into place. If you put it in properly, the green lock lever will lift automatically.
Step 7 - Reinstall the toner cartridge and drum unit assembly back into the printer. Do not close the front cover yet.
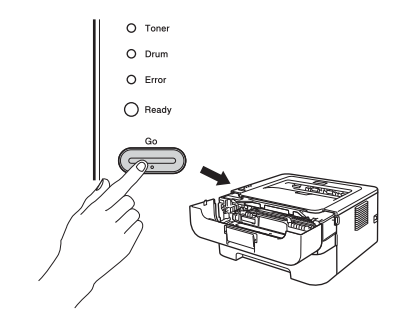
Step 8 - Press and hold down “go” button for 4 seconds until the LEDs light up. Once all 4 LEDs are lit, release “go” button.
Other common error message for drum unit
“Drum!”
When the “Drum” LED flashes and the “Drum!” display on the LCD of the printer, it means the drum unit can not be detected by the printer.
Solution 1: Clean the corona wire on the drum unit. Slide the green or blue tab back and forth across the drum unit 6-8 times, then return the tab back to its original position and try printing again.
If the solution 1 can not remove the error message, you may need to follow the instructions to reset the drum.
“Replace Drum” “Drum end Soon” “Drum Stop”
If the error message “replace drum” “drum end soon” or “drum stop” appear after replacing the new drum unit, it is possible that the drum unit counter is not reset.
Steps to manually reset the drum unit (take the Brother DR630 as an example)
The following steps may vary depending on the printer model. Therefore, before starting to reset the brother drum unit, be sure to follow the instructions designed for your model.
How to reset Brother DR630 drum unit for the following Brother DCP/MFC series printers:
DCP-L2520, DCP-L2520DW, DCP-L2540, DCP-L2540DW, MFC-L2680W, MFC-L2700DW, MFC-L2705DW, MFC-L2707DW, MFC-L2720DW, MFC-L2740DW.
1. Open the front cover of the printer.
2. Press and hold the "OK" button for about 2 seconds.
3. The display will show “replace Drum?”.
4. For DCP models, press “up arrow” to reset the drum counter.
5. For MFC models, press "1" to reset the drum counter.
6. Close the front cover.
How to reset Brother DR630 drum unit only for the following Brother printers:
HL-L2300D, HL-L2320D, HL-L2321D.
1. Open the front cover of the printer.
2. Press and hold the "GO" button for about 4 seconds until all the LEDs light up.
3. Once all 4 LEDs light up, release "GO".
4. Close the front cover.
5. And make sure your Drum light is off
How to reset Brother DR630 drum unit for the following Brother HL printers:
HL-L2305W, HL-L2315DW, HL-L2340DW, HL-L2360DN, HL-L2360DW, HL-L2380DW, HL-L2340DW, HL-L2360DW, HL-L2380DW.
1. Open the front cover of the printer.
2. Press and hold the "OK" button 2 seconds.
3. When "Drum Unit" appears on the display, press "OK".
4. Press “up arrow” key for reset.
5. Colse the front cover.
How to reset Brother DR630 drum unit for other Brother printers:
MFC-L2720DW, MFC-L2740DW, DCP-L2560DW, HL-L2380DW.
1. Make sure your printer is powered on.
2. Close the printer cover.
3. Press “×” to clear the error message.
4. Press “Settings”, then select “All Settings”>”Machine Info”>”Parts Life”.
5. Press and hold “#” until LCD displays “Reset Menu”.
6. Press “Drum”, then “Yes” to reset drum.
7. “Accepted” will appear then go to “Home” page. Now your printer is ready to print.
How often should I replace drum unit?
For Brother printers, the toner cartridge and drum unit are purchased separately. Toner cartridge usually needs to be replaced first and the drum unit typically requires replacement after the use of 3 or 4 toner cartridges, because the drum units have higher page yields.
You can extend the service life of the drum unit and keep it clean by occasionally cleaning the corona wire. You can do this simply by sliding the green tab back and forth.
Do drum unit have the shelf life?
The shelf life of the drum unit is approximately two years if the drum unit did not open and stay in its protective bag.
If the protective bag of the drum unit is lost or the bag has been opened, the drum unit is valid for six months. Once the shelf life of sealed and unsealed drum unit expires, the print quality may go down. Please replace the new drum unit in time.
The protective bag of the drum unit prevents light and dust from entering and damaging the internal components of the drum unit. If you accidentally open the package and do not intend to install the drum unit immediately, please reseal the protective package with tape or glue. Before preparing to install the drum unit, store the bag in a cool and dry place in the temperature range of 32 to 104 degrees and the humidity level of 35% to 85%. If the temperature exceeds 104 degrees, below 32 degrees or above / below the humidity range, the shelf life of the drum unit will be consecutively reduced for five days.
Related Products
 Compatible High Yield Black Toner Cartridge - 4 Packs")
-
entry_color
-
2600 Each pagesentry_pageyield
-
text_freeentry_shipping
-
48 HRsentry_delivery
-
text_compatible_printers

-
entry_color
-
12000 pagesentry_pageyield
-
text_freeentry_shipping
-
48 HRsentry_delivery
-
text_compatible_printers
 Compatible High Yield Black Toner Cartridge - 4 Packs")
-
entry_color
-
3000 Each pagesentry_pageyield
-
text_freeentry_shipping
-
48 HRsentry_delivery
-
text_compatible_printers