Common printing quality problems and solutions of Brother printers
If you are looking for the solution for the quality problem of Brother printer, this article will help you! Printer quality problems often get us into trouble, but in fact, many problems can be solved in a few simple steps. Let's jump in!
Reading Guide:
- Pages print are Faint, Light or Faded
- Pages print with gray background
- Pages print with Ghost
- The printed pages have dots or spots
- Lines across the page
- White lines across the page
- White lines, bands or ribbing across the page
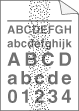
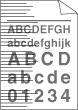
Pages print are Faint, Light or Faded

1. Toner or ink level is low
You need to replace the toner cartridge or the ink cartridge with a new one. V4ink provide you with best price compatible toner cartridges (e,g. Brother TN660), which can save you up to 80% than ordering from OEM.
How to replace brother toner cartridge?
> Click here to see how to replace the toner cartridge.
2. The environment of the machine
Please check the environment of the machine, conditions such as humidity, high temperatures, and so on, may cause this print fault.
3. The “Toner Save” mode is on
If the whole page is too light, please check if the “Toner Save” mode have turned on. You can step by step to turn off the “Toner Save” mode by following:
STEP 1 - On your touchscreen, press “Settings.”
STEP 2 - Press up and down symbols buttons to go into all settings.
STEP 3 - Press “All settings.”
STEP 4 - Press up and down buttons to go into the General setup.
STEP 5 - Press “General Setup.”
STEP 6 - Press up and down buttons to go into Ecology.
STEP 7 - Press “Ecology.”
STEP 8 - Now, press on “Toner Save.”
STEP 9 - Check it is in OFF state or ON state. If it is in ON state, then Press OFF.
STEP 10 - Press Home>>settings>>Toner>>Test Print.
After printing the pages, press Home again.
4. The drum unit is dirty
You should clean the drum unit.
Step 1 - Open the front cover of the machine.
Step 2 - Remove the toner cartridge and drum unit assembly from the machine.
Step 3 - Push down the green lock lever and take the toner cartridge out of the drum unit.
Step 4 - Turn the drum unit as shown in the illustration. Make sure the drum unit gear is on the left side.

Step 5 - Turn the edge of the drum unit toward you by hand while looking at surface of the suspected area.
Step 6 - Wipe the surface of the drum gently with a dry cotton swab until the mark on the surface comes off.

Step 7 - Put the toner cartridge firmly into the drum unit until you hear it lock in the place.
Step 8 - Install the toner cartridge and drum unit assembly back into the machine.
Step 9 - Close the front cover of the machine.
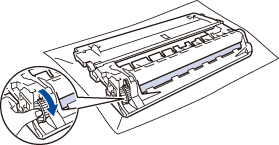
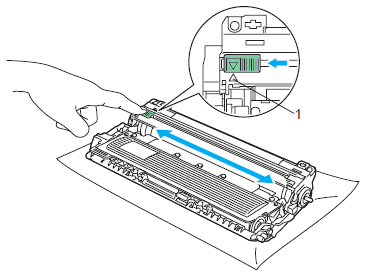
5. The corona wire of the drum unit is dirty
You should clean the corona wire of the drum unit.
Step 1 - Open the front cover of the machine.
Step 2 - Remove the toner cartridge and drum unit assembly from the machine.
Step 3 - Push down the green lock lever and take the toner cartridge out of the drum unit.
Step 4 - Slide the green or blue tab back and forth across the drum unit 6-8 times, then return the tab back to its original position.
Step 5 - Put the toner cartridge firmly into the drum unit until you hear it lock in the place.
Step 6 - Install the toner cartridge and drum unit assembly back into the machine.
Step 7 - Close the front cover of the machine.
6. The drum unit may be damaged
You should replace the drum unit with a new one.
> Click here to see how to replace the toner cartridge.
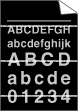
Pages print with gray background

1. The environment of the machine
Please check the environment of the machine, conditions such as humidity, high temperatures, and so on, may cause this print with gray background.
Clean the drum unit.
2. The drum unit is dirty
> Click here to see how to clean the drum unit.
3. The toner cartridge may be damaged
> Click here to see how to replace the toner cartridge with a new one.
4. The drum unit may be damaged
> Click here to see how to replace the drum unit with a new one.
Pages print with Ghost

1. The environment of the machine may cause the problem
Check the machine’s environment. Conditions such as low humidity and low temperatures may cause this print quality problem.
2. Make sure you are using the right paper
When printing with a laser printer, it is best to use a specific type of paper. If the paper is too thick, too shiny, or not suitable for laser printing, the toner may not adhere to the page correctly.
3. The media types in the menu do not match
You should adjust the paper setting.
If you are using a specific type of paper, like laser printer paper, make sure that the paper setting matches the paper type. Usually a quick paper setting adjustment will clear up a ghosting issue right away.
4. The drum unit is dirty
> Click here to see how to clean the drum unit.
5. The drum unit may be damaged
> Click here to see how to replace the drum unit with a new one.
6. The toner cartridge may be damaged
> Click here to see how to replace the toner cartridge with a new one.
7. The fuser unit may be contaminated
You should clean the fuser.
Step 1 - Open the fuser cover.
Step 2 - Push down the green levers. Now you have access to the fuser roller. (Note: it could be very hot)
Step 3 - Wipe away any excess fuser oil using a soft cloth. When the printer is in use, fuser oil may leak onto other surfaces inside the printer. Do not wipe the fuser rollers with the cloth.
Step 4 - Use the hose attachment on a vacuum cleaner to remove any debris from around and on the fuser rollers. If necessary, use a thin, pointed nose attachment to reach tight spaces.
Step 5 - Close the fuser cover.
The printed pages have dots or spots
1. The corona wire of the drum unit is dirty
> Click here to see how to clean the corona wire of the drum unit.
2. The drum unit may be damaged
> Click here to see how to replace the drum unit with a new one.
3. The fuser unit may be contaminated
> Click here to see how to clean the fuser.
Lines across the page
1. The corona wire of the drum unit is dirty
> Click here to see how to clean the corona wire of the drum unit.
2. The drum unit may be dirty
> Click here to see how to clean the drum unit.
3. The drum unit may be damaged
> Click here to see how to replace the drum unit with a new one.
White lines across the page
1. Make sure you are using the right paper
When printing with a laser printer, it is best to use a specific type of paper. If the paper is too thick, too shiny, or not suitable for laser printing, the toner may not adhere to the page correctly.
2. The media types in the menu do not match
You should adjust the paper setting.
If you are using a specific type of paper, like laser printer paper, make sure that the paper setting matches the paper type. Usually a quick paper setting adjustment will clear up a ghosting issue right away.
3. The problem may disappear by itself
Printing multiple blank pages can solve this problem, especially when the machine has not been used for a long time.
4. The drum unit may be dirty
> Click here to see how to clean the drum unit.
5. The drum unit may be damaged
> Click here to see how to replace the drum unit with a new one.
White lines, bands or ribbing across the page

1. The environment of the machine
Please check the environment of the machine, conditions such as humidity, high temperatures, and so on, may cause this print fault.
2. The drum unit may be dirty
> Click here to see how to clean the drum unit.
3. The drum unit may be damaged
> Click here to see how to replace the drum unit with a new one.
If the common issues and solution above still can not solve your problem, please contact our customer service team: support_team@v4ink.com, we will give you an appropriate answer according to your actual situation.
 Compatible High Yield Black Toner Cartridge - 4 Packs")
 Compatible High Yield Black Toner Cartridge - 2 Packs")